Woodruff Shelties
Puppy Survival Guide - Grooming
Grooming is daunting to many people, but doesn’t need to be! With a few simple guides, you can try grooming your puppy yourself and avoid the expense, hassle and potential scares of using a groomer.
Shelties are a natural breed and need only a small amount of grooming to look stunning! Ironically, most owners do a MUCH better job than most groomers at keeping Shelties in their best beauty.
This page is dedicated to helping you learn the few skills you’ll need - take a deep breath, keep an open mind, and slide these topics open!
Doing it yourself has many advantages over using a groomer:
- the 2-week routine is easier to keep up with at home
- annual savings of at least $360
- less stress for the dog
- owners care more than groomers about getting their dogs’ nails getting trimmed short enough
Watch my video to learn a great, safe method of trimming nails!
Puppy Sheltie ears will benefit from a bit of training. Around 8 or 9 weeks old, the ears may start to “fly.” Unfortunately, this family of Shelties tends towards prick ears, which can detract from the softness/sweetness of the dog’s natural expression. Just a few months of training will keep your puppy’s earset intact through teething, and you’ll enjoy the results for life!
The only time in a Sheltie’s life when the earset can be trained is if you start immediately when the problem starts, and reapply the glue/brace within 24 hours of it coming free. Procrastinate,.
I’ll show you a gentle, non-painful method to help the ears retain their natural shape, whether your puppy is at risk of prick ears or droop ears.
You’re DONE once the ears stay tipped on their own for a few days!
This method works if the puppy holds ears erect but just needs help tipping.
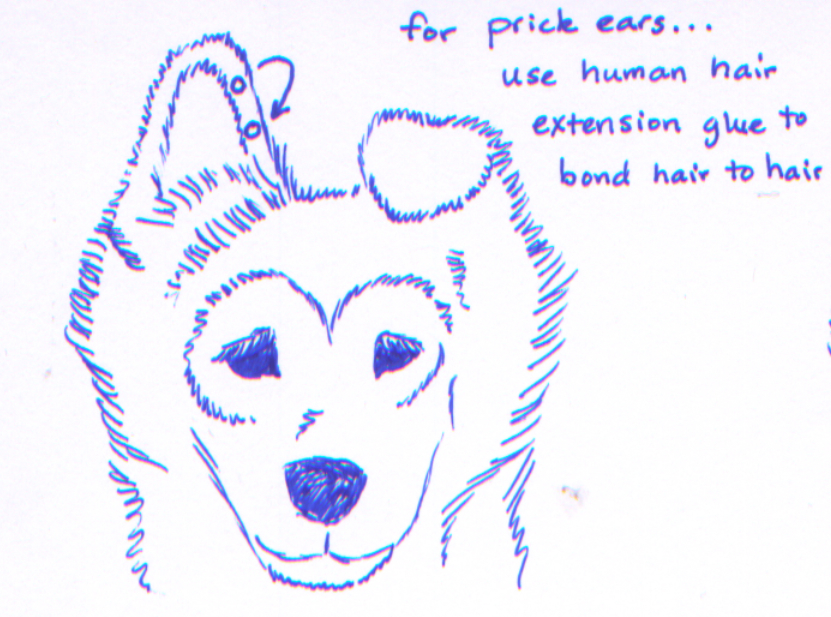
I use human hair extension glue to prevent prick ears. The glue stays in place for about 2 weeks, making life MUCH easier! This glue is designed specifically for temporarily bonding hair to hair and can be found in beauty supply stores.
Have someone hold the puppy, or wait until she falls asleep in your lap.
Figure where the ear naturally tips (2/3 up the ear). Put a bead of glue onto the inside edge of the ear hair close to the tip, fold the tip down onto the longer hairs on the inside near the base, and hold the ear in place until the bead of glue has bonded the hair together (see illustration).
When doing the second ear, be sure to make the ear fold at the same place as the first. Otherwise you will wind up with a lopsided earset.

Make sure there are no stray, long hairs caught in the glue and clip them with a small scissors. You can be sure there is a problem like this if the puppy tries to scratch at his ears.
This method works if the ears are held low, crooked, or off the sides.
I use a soft moleskin brace to teach the puppy’s muscles to hold the ears high, or to adjust where the ears tip. The adhesive on the moleskin’s backside is not strong enough, and you’ll need a surgical skin adhesive designed for skin (Skinbond is a good brand).
The brace will generally stay in place about 1 week before you will need to put in a new one.
Cut out moleskin as shown in the illustration and Skinbond all the layers together. When they are dry, remove the paper backing on the outside moleskin layers to expose the adhesive. Paint Skinbond onto the moleskin that will go into the base of the first ear.
Place the brace into the base of the first ear until it is securely adhering. Next, paint and affix the base of the brace into the second ear.

Once the bases is in place, paint the moleskin adhesive that the tips will go onto, and fold the eartips into place, holding until they are securely adhering.
If the ears aren’t held high enough, you can cut the braces so that there’s a strip of moleskin that will sit on the puppies forehead and connect the two bases.


